
Monday Morning Introductions Form
Daily class survey: http://tinyurl.com/dxuvaf7
Call Nick for lab issues after lectures are done in online classes:
Ce11ular: four two four – 2 five 9 – two one five 8
PDFs of Courseware & login information
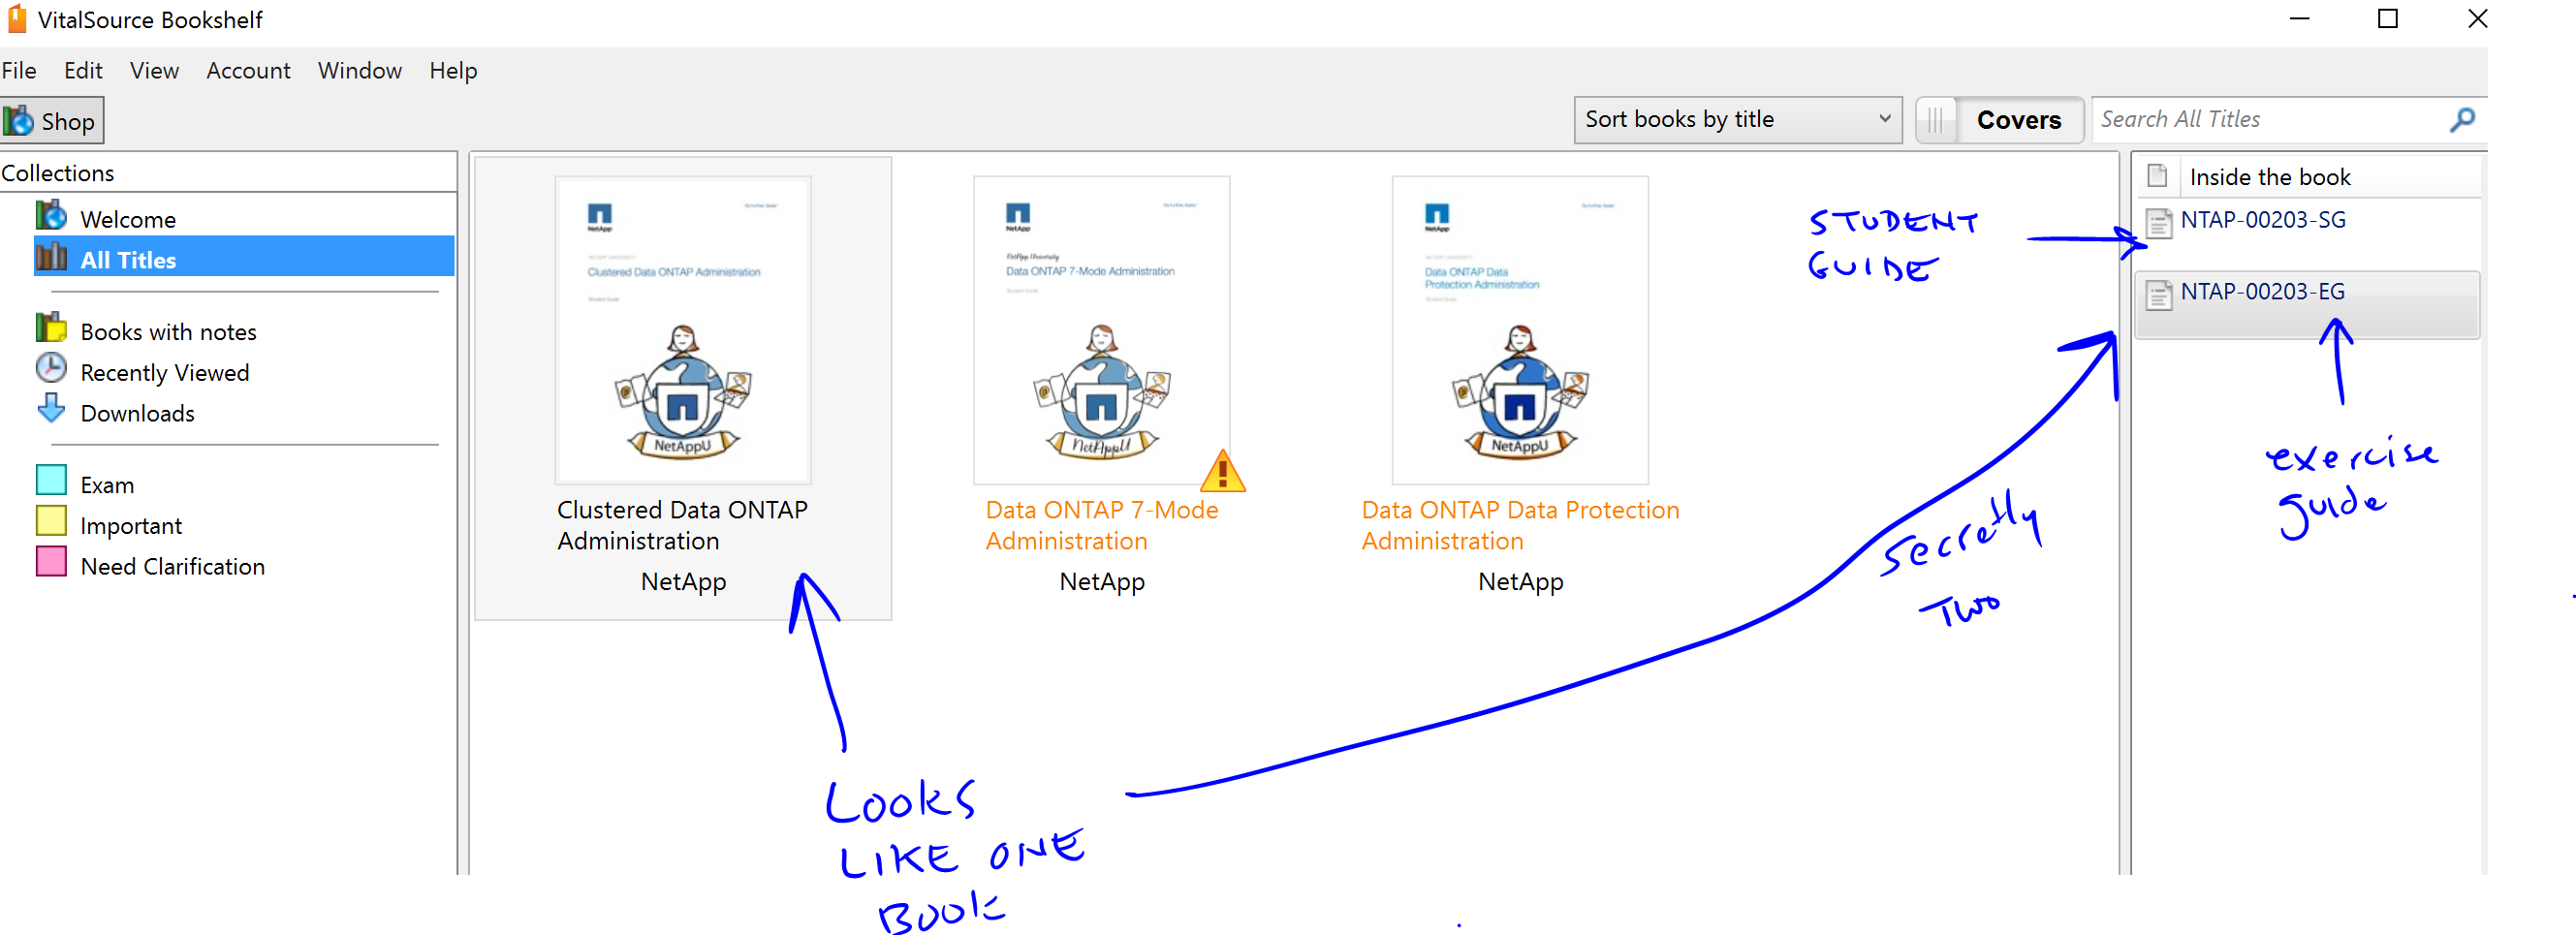
If you are using the vitalsource bookshelf application the exercise and student guides are hard to differentiate:
Links:
-
- NCIE Backup & Recovery guide practice test
-
-
-
ipv6 available in 7.x, & reintroduced in 8.1
-
- Free Online Classes from Netapp
- SVM Snapmirror Replication
- SnapLock Guide
- Order Netapp Documentation in Dead Tree Format
- hybrid_aggs
- Littles Law example Module
- Bunch of Powershell utility scripts
- howto collect perf. data via powershell
- sysstat CP Type info
- Simulator Download Page
- My Netapp Capacity Calculator:

- Cygwin Unix Environment on Windows
- Learn regular expressions: regex101.com
-
MRTG for Netapp: https://now.netapp.com/eservice/toolchest?toolid=392
- Harvest / Grafana / NABox: https://nabox.tynsoe.org/
-
system analyzer for cifs: https://now.netapp.com/eservice/toolchest?toolid=538
-
nagios network monitoring: http://nagios.org
-
-
linux perfmon: http://freshmeat.net/search?q=perfmon&submit=Search
- Netapp performance advisor for cifs: http://support.netapp.com/eservice/toolchest?toolid=538
- LogWatch – syslog aggregation utility
- support tools gui: http://community.netapp.com/t5/Developer-Network-Articles-and-Resources/GUI-for-NetApp-Support-Tools/ta-p/86221
- fio io tester (compiles on osx): http://freecode.com/projects/fio
- How to use iometer youtube playlist: https://www.youtube.com/watch?v=XkOUGbsnGn0&list=PL4B2767B16953CCD0
- Adding performance manager to unified manager
- Automated workflow analyzer (determining flashpool size)
-
Powershell script to create a viso of your storage systems and luns: here
- Powershell SDK 4.0 download
-
Steps
-
If audit logging is turned off, enter the following command to turn audit logging on:
-
options auditlog.enable on -
To change the maximum size of the audit log file, enter the following command:
-
options auditlog.max_file_size value -
value is the maximum size in bytes. The default value is 10,000,000 (about 10 MB).
- sending audit logs to a remote log server
- First enable syslog to a remote server
- enable accepting remote logs on your linux/unix log server
- add a line that says: “local7.* @your_log_server” to the netapp’s syslog.conf. reference
-
-
Tech Report 3183- NFS, Linux, netapp filers: http://www.netapp.com/library/tr/3183.pdf
-
TR-3481 (kerberos & nfs): http://www.netapp.com/library/tr/3481.pdf
- Hybrid Aggregate Design and implementation guide
- PNFS Best Practices & configuration guide for cmode: pdf
- options you can set on a volume (useful for cacheing options & settings) https://library.netapp.com/ecmdocs/ECMP1610202/html/volume/modify.html
- Demo of using insight to troubleshoot perf. problem
-
Samba Tuning (lots of overlap): http://www.samba.org/samba/docs/man/Samba-HOWTO-Collection/speed.html
-
Adjust MTU
-
Enable TCP Window Scaling (RFC 1323). http://searchnetworking.techtarget.com/generic/0,295582,sid7%5Fgci1329590,00.html
-
Allow ports above 5000. http://technet.microsoft.com/en-us/library/cc758002(WS.10).aspx
- Open Source AD server based on Samba4
- ISCSI Multipathing:
Follow the steps for Red Hat:
1. Check the below packages available.
rpm -q device-mapper
rpm -q device-mapper-multipath

2.To start the multipath daemon
# /etc/init.d/multipathd start

3. To configure the DM-Multipath devices

# multipath

4. Configuring DM-Multipath to start automatically while booting.
chkconfig --add multipathd
chkconfig multipathd on

5. Verify that the multipathd is running
# /etc/init.d/multipathd status

6. To view a list of the multipath device
# multipath -ll
Application Best practice guides
Follow up
-
-
-
-
- v-series best practice guide (v-series uses another vendor’s san as back-end this is not a vfiler)
-
-
-
-
- Listing out all domain users:
- run from a unix host:
- Listing out all domain users:
rsh useradmin domainuser list -g ‘Administrators’ | sed ‘s/^S/rsh cifs lookup S/’
- HSM: https://communities.netapp.com/servlet/JiveServlet/download/52715-23963/WP-7127%20NetApp%20Virtual%20Storage%20Tier.pdf
- Disk reassignhttps://kb.netapp.com/support/index?page=content&id=1011998
- Lun Block alignment KBR
- As emphasized in the previous section, there are multiple layers of storage involved. Each layer is organized into blocks, or chunks, to make accessing the storage more efficient. The size and the starting offset of a file system should align with the start of a block in the next lower layer of storage. For example, an NTFS file system that resides on a LUN should have an offset that is divisible by the block size of the storage array presenting the LUN. Misalignment of block boundaries at any one of these storage layers can result in performance degradation.
-
- This issue is not unique to NetApp storage arrays and can occur for storage arrays from any vendor.
-
- Cluster mode network diagram & best practices guide Link
- NDMP Info: Data Protection & Revovery guide
- Vfiler Implementation GuidePDF
- CP Trigger info
- SSH public key authentication
- Convert snapmirror to snapvault snapshots
- Info about netapp certifications
- Netapp OpenSSL Heartbeat Vulnerability KB article
- setting up passwordless ssh on ctap:
nick@ubuntu:~$ ssh-keygen -t dsa

Generating public/private dsa key pair.

Enter file in which to save the key (/home/nick/.ssh/id_dsa): /home/nick/clusterkey

Enter passphrase (empty for no passphrase):

Enter same passphrase again:

Your identification has been saved in /home/nick/clusterkey.

Your public key has been saved in /home/nick/clusterkey.pub.

The key fingerprint is:

d4:a5:07:e4:31:02:e0:3e:b3:8b:1c:1f:be:48:86:5c nick@ubuntu

The key's randomart image is:

+--[ DSA 1024]----+

|    ......= .    |

|   .     + *     |

|    .   . + .    |

|   .   .   .     |

|   E+   S        |

|...  +           |

|..+ o            |

| + * o           |

|  + =.           |

+-----------------+

nick@ubuntu:~$ chmod 600 /home/nick/clusterkey*

nicktest-8.2::*> security login create -username sshtest -application ssh -authmethod publickey -role admin

Warning: To use public-key authentication, you must create a public key for user "sshtest".
nicktest-8.2::*> security login publickey create -username sshtest -index 0 -publickey “ssh-dss AAAAB3NzaC1kc3MAAACBAOfKVaeqtM5kXBKkqqF8T6zZWReKZlh0VeHS/PST/ygYY193XOD3OqK7sz7h+0MfNj8Z3KoF9zKWdC+Wteb6a43WGFQEqa+XgmZcHIIiwL6ldovJIesc44Ws/K9ehzHUETJfg945VxVnOlu5CEuScBPBu2WL7xEAf6UidWwPbqKPAAAAFQDmFn0RBMndolrmH8cFvS73WGaZJQAAAIEA4tBWCGfdZHg9ZyqOHYg7I7/fPmI8pqsI7xGmtz37/oXHQ9Izj8ezTnwLgrYJKXpAYo4vx4aP3gn4TlrDU5MyAO+P4YW1zQRRh40wgv4z+fnh0mOk9CyRhGN7JrmAjDsIF3HEUET4GhN2/v3xroYsMKTNb5SXJQhXK/Xestp7OGwAAACBAMk+QpOmqn3KDMOE5XcQMrxoWUjIBRwlmxq768PBM7mtUsq40nTpntexqvAkXTpS7AwRt3FVtsHbGUm+63eErISbhAbLjCpkphf9M4PqeQ4zu2YG0ZHdbd7EX4l3dPFDhN/jUaJTcHU+LSJBwRnkEevVHCSzDxLXgYwZIw37kYXS nick@ubuntu”
- ssh to vserver example:
::> security login unlock -username vsadmin -vserver nfs::> security login password -username vsadmin -vserver nfsEnter a new password:
Enter it again:
::> security login unlock -username vsadmin -vserver nfs
Once you have the vsadmin, login via SSH using vsadmin@vs_mgmt_lif.
- Flashpool implementation guide
- Clustered Ontap Krb + Ldap Authentication
- Clusterd Ontap Cifs configuration including AD authentication
- Allow AD users to log into the cluster via ssh:
cluster1::> security login create -vserver cluster1 -username DOMAIN1\Administrator -application ssh -authmethod domain -role admin
cluster1::> vserver create -vserver vs -rootvolume vol -aggregate aggr -ns-switch file -rootvolume-security-style mixed
cluster1::> vserver cifs create -vserver vs -cifs-server vscifs -domain companyname.example.com -ou CN=Computers
cluster1::> security login domain-tunnel create -vserver vs
-
- Diagrams from Irvine DCADM8 Class, Dec. 2014
- 7Mode Transition tool documentation
- root vserver protection for cmode
- web based courses for (not instructor lead) for netapp
- Video on Netapp Virtual Story Console
- Exchange 2013 Migration best practices (includes volume layout recommendations)
- Convert a snapmirror (DP) relationship to snapvault (XDP)
- import netgroups on cmode
- Multiprotocol express guide
- sas expander info
- VMWARE Best practices
- tape backup and recovery guide w/ ndmp info
- commands to manage a tape library in cmode
- 8.3 Antivirus Configuration Express Guide
- Dynamic ACL overview and setup (on windows 2012)
- netapp ssh idle timeouts (7mode)
- nfsv4 guides for clustermode
- sysstat man page
- wfa youtube video
- performance manager 1.0 youtube demo (old version)
- SNMP monitoring on clustered ontap
- SVM DR Replication (8.3.1)
- oracle dynamic read & write sizes w/ nfs: http://docs.oracle.com/cd/E19253-01/817-0404/6mg74vsgc/index.html
- vmware best practices: http://www.netapp.com/us/media/tr-4068.pdf
- CMODE Cli adding ssl certs
- SMB Referrals:
-
Cluster::*>vserver cifs options modify -vserver vserver_name -is-referral-enabled (true|false)
-
- SMB Referral extended info: http://www.netapp.com/us/media/tr-4543.pdf
- How to see if your chassis is single or dual node:
-
cluster1::> system chassis show

Chassis ID                 Status          List of Nodes
-------------------------- --------------- ----------------------------------
4591227214                 ok              node1,node2
4591227000                 ok              node1,node2
- Netapp firewall Ports: https://library.netapp.com/ecmdocs/ECMP1368834/html/GUID-45640E38-88B6-4AA7-9D36-90C1076E1A76.html
- Redhat list of NFS ports: http://www.netapp.com/us/media/tr-4557.pdf
- Flexgroups (evolution of infinite volumes) http://www.netapp.com/us/media/tr-4557.pdf
- Cisco netapp SBA: http://www.cisco.com/c/dam/en/us/td/docs/solutions/SBA/February2013/Cisco_SBA_DC_NetAppStorageDeploymentGuide-Feb2013.pdf
- Workflow automation store SVM DR automation
- Edit volume alert thresholds in unified manager
- SVM DR identity preserve correct info
- Table of configurations replicated during svm dr
- Customized quota report courtesy of Jim MacDonald:
-
ssh $USER@$netapp 'set advance ;set -confirmations off ; set -units KB ; set -showseparator "," ; quota report -fields quota-type,quota-target-id,volume,tree,disk-used,disk-limit,threshold,quota-specifier'
- Netapp Express Guides
- Cdot Cifs auditing
- NTLM & SMB Automatic Referrals
- VServer FPolicy Configuration
- Netapp Flexarray (non-netapp backend storage)
- Powershell example on how to create a quota:
$myCluster = "192.168.0.50"

$myGroup = "developers"

$myVolume = "quotavol"

$myVserver = "svm_red"

$myDiskLimit = "1gb"

$mySoftDiskLimit ="500mb"
Connect-NcController -Name $myCluster -HTTPS -Vserver $myVserver
New-NcQuotaPolicy -PolicyName myPolicy -Vserver svm_red
Add-NcQuota -Group $myGroup -Volume $myVolume -DiskLimit $myDiskLimit -SoftDiskLimit $mySoftDiskLimit -Qtree “test” -Policy myPolicy